Visit >> My New BLOG!!!!

Showing posts with label PC Adjustments. Show all posts

Friday, October 26, 2007

Disable Autoplay Feature on USB Flash Drives

Some virus, especially worms, like pooh.vbs, spreads beacause of the autoplay function of USB Flash Drives. This guide will let you minimize virus from spreading and infecting your system.

First of all, you must log-in as an Administrator to do this.

Steps:
1. Open the Run dialog box ( [Windows] - [R] ), then type gpedit.msc, hit [Enter].

2. On the left pane, click "Administrative Templates", then "System".

3. On the right pane, locate "Turn Off Autoplay" and double-click on it.

4. Set it to "Enable" and choose among the drives ( CD - ROM or All Drives ) you wish to turn it off, below.


Hope this helps =)

Disable / Enable Your Registry Editor

Here are the simpliest ways to enable and disble your Registry


Open Start - Run and type:


REG add HKCU\Software\Microsoft\Windows\CurrentVersion\Policies\System /v DisableRegistryTools /t REG_DWORD /d 0 /f

to ENABLE Registry editing.

type:

REG add HKCU\Software\Microsoft\Windows\CurrentVersion\Policies\System /v DisableRegistryTools /t REG_DWORD /d 1 /f

to DISABLE Registry editing.

Sunday, August 19, 2007

Find Out What Your PC Is Really Up To

The Windows Task Manager provides a good start when you try to discover what programs are running on your system, but it's only a first step. For more-detailed data, you need another tool. Your best bet: Sysinternals Process Explorer.

Get Process Explorer for Windows v10.21 at Microsoft TechNet. It needs no formal installation; just unzip it and run the .exe file. It will then list your PC's active processes, much as Task Manager does, but with better descriptions and organization.

Interpreting Process Explorer's information is fairly straightforward (and killing processes works much as it does in Task Manager), but here are some tips to help you make the most of the utility.


  • Consider adding the useful 'Handles' column to the view. Handles (a term that refers to programming methodology) are a convenient way to measure a process's resource utilization. Processes with high handle usage should be the first ones you kill when resources run low. Add the column by right-clicking in the header area and clicking the Select Columns option. Click the Process Performance tab and check the box next to Handle Count.

  • Note that Handles can also be created for media-based devices like CD-R drives, which may cause errors on eject. If you can't safely eject a disk or memory card, use the Find menu to search for the drive letter followed by a colon (for example, E:), and kill that process directly.

  • Instead of outright killing a process, you can suspend it (right-click on a process to see this option). This can be useful in the case of a runaway program stuck in an endless loop.

  • Want to know what a program's process identification is to better tell whether it's friend or foe? Open the program, then switch to Process Explorer. In the top-right corner is a target icon (concentric circles). Click this icon and drag it onto the program you want to ID; Process Explorer will highlight the process.

List More Recently Used Documents

Do you often access your recently used documents and files? Maximize the capacity of My Recent Documents to store more recently used files in your Start Menu.

In Windows XP Professional, you access recently opened documents by going to Start and select My Recent Documents, but the list shows only 15 files from all the many programs you may have used recently.


Here's how to display more recently used files:
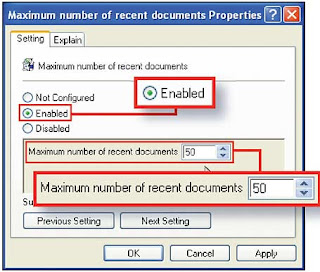
1. Go to Run and type "gpedit.msc", press Enter.

2. In the left pane, navigate to and select User Configuration\Administrative Templates\Windows Components\Windows Explorer.

3. Double-click Maximum Number of Recent Documents in the right pane. Select Enabled, and then set the maximum number of recent documents to something higher than the default of 15.


To make icons appear smaller in the Start Menu:
1. Right-click Start

2. Select Properties, click Customize and under the General tab, choose Small Icons.

Saturday, August 18, 2007

Giving Priority To An Application


Out of nowhere, the application you're working with slows to a crawl because some other less-important app or background process has gobbled up Windows resources.

You can allocate more resources to the program by changing its priority in the Task Manager applet.

How to Open The Windows Task Manager:

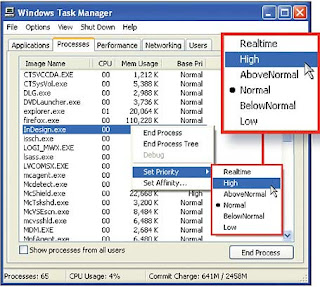
1. Right-click the Desktop Taskbar and choose Task Manager.

2. Click the Processes tab and right-click the executable file that corresponds to the application.

3. Click Set Priority, and choose a level--for instance, Above Normal or High. Click Yes when you see the warning. Note that changing the priority of one process can affect the speed of others. The Realtime choice, for instance, gives your application the highest priority of all, but it can bring the rest of your system to a standstill, so it's best to avoid this option.

Regardless, if you're having problems burning CDs, for example, you may want to increase the priority of your CD-burning software. And if you have an app doing some low-urgency work in the background, you might consider setting it to a lower priority. The changes you make will apply only to the current session; the priorities will return to their former state the next time you start Windows.


To see the priority of all processes currently running on your system without having to right-click each one, choose View, Select Columns in the Task Manager window. Check Base Priority and click OK. You will then see a column that lists each process's priority information.

Know Windows Task Manager better, because it helps alot

Prevent Pop-Ups

A text balloon repeatedly pops out of the system tray on Windows XP's taskbar to warn you that an update is ready to install, or to provide some other nugget of information you don't really need to address at that instant. For me, this pop-up balloons are very annoying, especially PCs in Internet Cafes... "Windows Virtual Memory Too Slow"...

How to Get Rid of Pop-Ups using Tweak UI.

1. Open the program and select Taskbar and Start menu in the left pane.

2. Uncheck Enable Balloon Tips on the right.

3. Click OK.


For Pops-Up Windows, you may also download this:

Pop-Up Stopper Free
- Prevents Pop-Up Windows when browsing the net.
- 511 KB

Don't Lose Your Focus


So there you are, minding your own business, typing a document, e-mail, or instant message on your computer. You glance away from the screen for a moment. When you look back, you realize you haven't really entered your last lines of text. Without your knowledge, a new window or dialog box has popped up, and some of your text has been entered there--or nowhere. Applications that steal your PC's focus are more than just annoying: They can be disastrous if the focus-stealing dialog box asks to perform a potentially harmful operation and you happen to press [Enter] or type [Y], which the dialog takes as a "Yes" before you even see the request. You may also have dismissed an important scheduling alert without realizing it.

No solution exists, but the following may help you maintain your focus in Windows XP and 2000 by Microsoft's free Tweak UI.

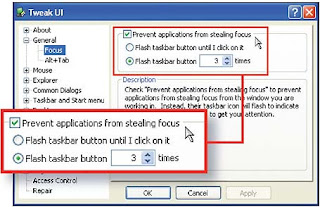
Open Tweak UI by typing tweakui on Run, and press [Enter] and use the tree pane on the left to navigate to General, Focus. Make sure "Prevent applications from stealing focus" is checked. You can also specify whether the taskbar button should flash and how many times when the would-be focus grabber wants your attention. Click OK.


Some Tweak UI settings get changed back when a program subsequently modifies the Windows Registry. To make sure the focus lock is in effect every time you start Windows, start Notepad or another text editor.

1. On the first line, type "Windows Registry Editor Version 5.00" and press [Enter] twice.

2. Type "[HKEY_CURRENT_USER\Control Panel\Desktop]" and press [Enter].

3. Finally, type "ForegroundLockTimeout"=dword:00030d40 and press [Enter].

4. Save name the file with the .reg extension like focus.reg), and place it to a location of your choice. Make a note of the path to the file.

5. Next, choose Start, All Programs, right-click the Startup menu, and choose Open.

6. In an empty area of the Startup folder, right-click and choose New, Shortcut.

7. In the Create Shortcut wizard, browse to your .reg file, select it, and click OK.

8. Place quotes before and after the entry, and then press [Home].

9. Type "regedit.exe /s" followed by a space in front of the first quotation mark in your entry.

10. When completed, the entry should read something like this: regedit.exe /s "C:\Registry files\focus.reg" (your path may differ).

11. Click Next, type a name for your shortcut, and click Finish. Now every time you log on, this shortcut will reinstate the anti-focus-stealing setting.
You're all set! Continue on what you are doing.

Sunday, August 12, 2007

Accelerate Windows Virtual Memory

The following tricks I will share to you can surely lessen hassle in your computer! As a look around on tip sites, I found a lot of myths and harebrained theories about optimizing virtual memory -- a few of them even very useful to me. This time I went to experiment Microsoft-approved ways to set Windows' memory management to full steam ahead.

Virtual Memory is an "imaginary memory area" supported by some operating systems (Windows but not DOS) in conjunction with the hardware. You can think of virtual memory as an alternate set of memory addresses. Programs use these virtual addresses rather than real addresses to store instructions and data. When the program is actually executed, the virtual addresses are converted into real memory addresses.

The purpose of this virtual memory is to enlarge the address space, the set of addresses a program can utilize. For example, virtual memory might contain twice as many addresses as main memory. A program using all of virtual memory would not be able to fit in main memory all at once. Nevertheless, the computer could execute such a program by copying into main memory those portions of the program needed at any given point during execution.

To facilitate copying virtual memory into real memory, the operating system divides virtual memory into pages, each of which contains a fixed number of addresses. Each page is stored on a disk until it is needed. When the page is needed, the operating system copies it from disk to main memory, translating the virtual addresses into real addresses. This process of converting virtual addresses into real addresses is called "mapping" and the process of copying of virtual pages from disk to main memory is known as paging or swapping.


How to Tweak Windows' Virtual Memory:

If you have only one hard drive, just leave well enough alone. But if you have two or more internal or external hard drives (not just disk partitions), your PC will be peppier if you keep the default paging file (what Microsoft calls the virtual memory disk space) on your boot drive (the one that holds Windows) and add a paging file to the second drive.

To do so, log in to Windows as an Administrator and verify that you have more than one hard drive in your computer: Click Start, Run, type "diskmgmt.msc", and press [Enter] to open the Disk Management utility (click Continue in the User Account Control, if necessary). The bottom pane shows each disk on your system and the drive letter that corresponds with each partition. To have only one new paging file, choose the fastest drive you have. Remember that an internal drive will be faster than an external drive in most cases. Note the drive letter(s) you'll use.

Now right-click My Computer and choose Properties. Select the Advanced tab. In the Performance section, click Settings and then the Advanced tab. Under Virtual Memory, click Change. You'll see a paging file size already listed on your Windows drive; leave it alone, or Windows won't be able to create a memory dump file with debugging info in the event of a particular type of system error.

Next, in the drive list select a partition on a different drive where you want to add another paging file. Select Custom Size if you want to set the size yourself and type in the initial and maximum size; Microsoft's rule is to make the file 1.5 times the amount of RAM in your system, or select System Managed Size to let Windows determine the size. Click Set, then OK.

If the partition you selected contains another installation of Windows, you'll receive an error message warning that the file pagefile.sys already exists there. As long as the two operating systems are not running at the same time using virtualization software, it's safe for you to overwrite or delete pagefile.sys, since Windows will re-create the file automatically the next time you boot that partition's Windows installation.

You'll see a reminder that the changes will take effect the next time you restart your system. Windows will most often use the paging file on the least-busy drive, which means your new paging file will do most of the work.

    This process was accidentally discovered by me when I experimented on My Computer and turned out to be CORRECT! Don't be afraid to experiment on your OWN computer. It's not dangerous as long as you know how to read and understand commands. =)

Saturday, August 11, 2007

Windows XP into High Gear!

Use Windows XP own tools to maximize your PC performance with easy adjustment settings and without spending.

Here are some ways how to boost your PC performance:

1. Adjust visual effects by going to the Control Panel/System/Advanced/Performance Settings/Visual Effects and uncheck the boxes of your choice. Visual Effects makes your PC operate slower

2. Adjust power settings by ging to Control Panel/Power Options and adjust power settings of your choice.

3. Open Disk Cleanup by right-clicking the disk's icon in Explorer and choose Properties/General/Disk cleanup; or choose Start/Run and type cleanmgr.exe to delete unused files.

4. View Event Logger by going to Start/Run and type eventvwr.msc

5. Check your PC's Reliability and Performance by going to Start/Run and type perfmon.msc

6. Familiarize your current applications and processes by using Windows Task Manager by pressing [Ctrl]*[Shift]*[Esc] or [Ctrl]*[Alt]*[Del] or right-click on the desktop toolbar and select Task Manager.

7. Open your System Informations by going to Start/All Programs/Accessories/System Tools/System Information. 8. Run Disk Defragmenter by right-clicking the disk's icon in Explorer and select Properties/ Tools/Defragment now to compress space sort files and manage them.