Out of nowhere, the application you're working with slows to a crawl because some other less-important app or background process has gobbled up Windows resources.
You can allocate more resources to the program by changing its priority in the Task Manager applet.
How to Open The Windows Task Manager:
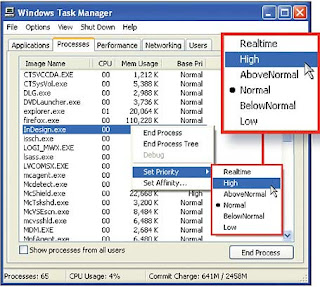
1. Right-click the Desktop Taskbar and choose Task Manager.
2. Click the Processes tab and right-click the executable file that corresponds to the application.
3. Click Set Priority, and choose a level--for instance, Above Normal or High. Click Yes when you see the warning. Note that changing the priority of one process can affect the speed of others. The Realtime choice, for instance, gives your application the highest priority of all, but it can bring the rest of your system to a standstill, so it's best to avoid this option.
Regardless, if you're having problems burning CDs, for example, you may want to increase the priority of your CD-burning software. And if you have an app doing some low-urgency work in the background, you might consider setting it to a lower priority. The changes you make will apply only to the current session; the priorities will return to their former state the next time you start Windows.

To see the priority of all processes currently running on your system without having to right-click each one, choose View, Select Columns in the Task Manager window. Check Base Priority and click OK. You will then see a column that lists each process's priority information.
Know Windows Task Manager better, because it helps alot

No comments:
Post a Comment